 |
| This is a very long page covering many aspects of goalie skates, and it's divided into two sections: the shell, and the boot. You can scroll way down for the new section on the boot or click here. There's a lot of information on this page that you won't find anywhere else, and if you take the time to read it properly, you'll end up with a much better understanding of your skates and how to get the most out of them. As a prerequisite, it helps to know what a bootout is, and there are video clips on the 'What is It' page. |
 |
 |
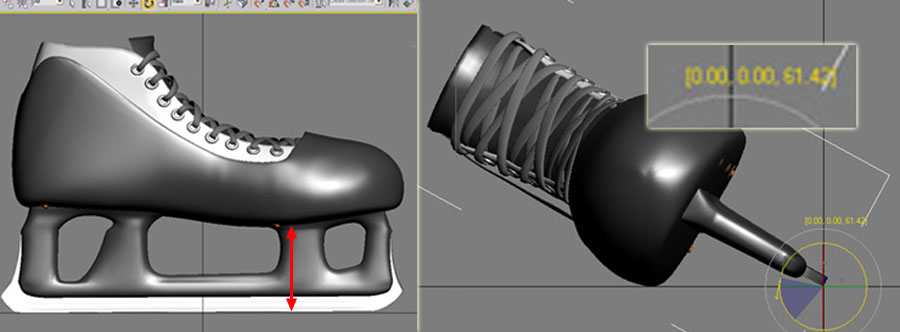
First, I'm going to look at shell width and shell height, which directly affect your mobility and explain why there are products like Overdrive, the Bauer Vertexx, and the Step blade. Shell width matters because it sets the limit of your mobility, but it only matters on the inside of the boot. |
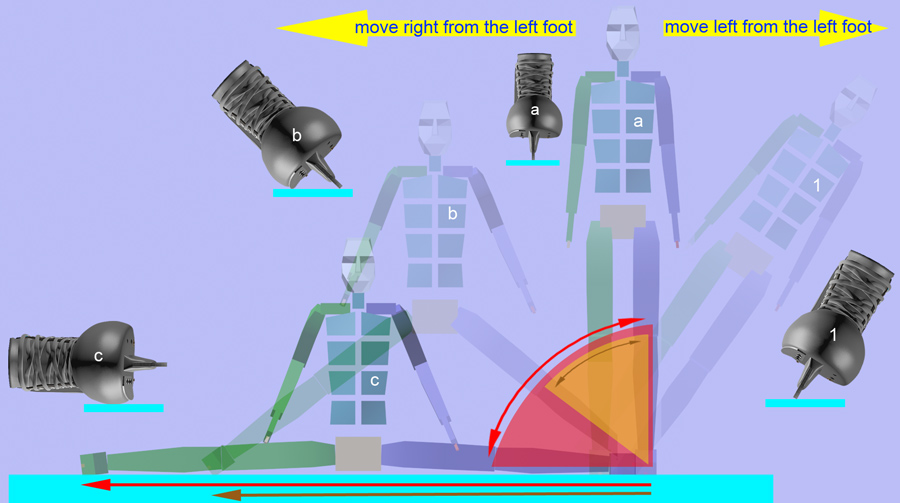 |
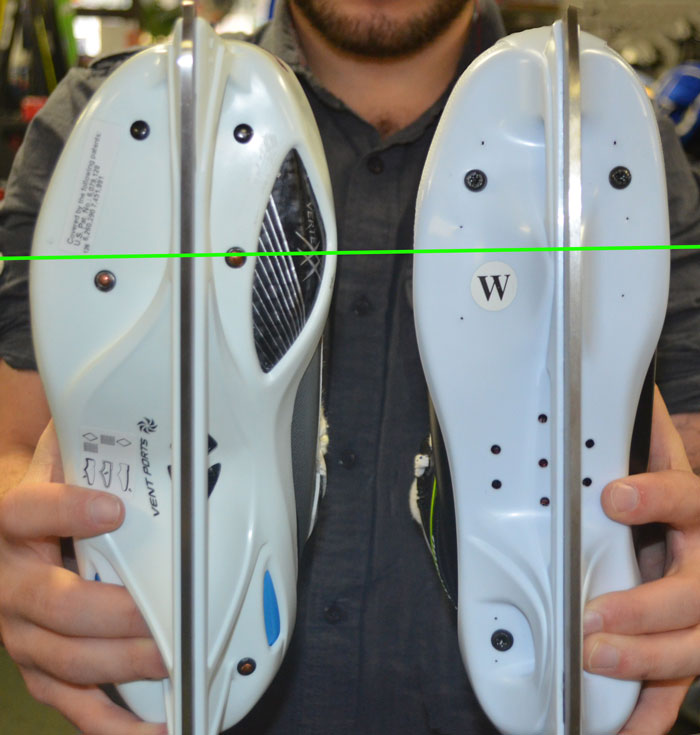
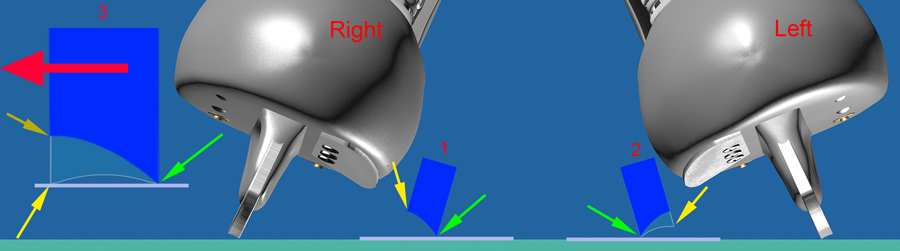
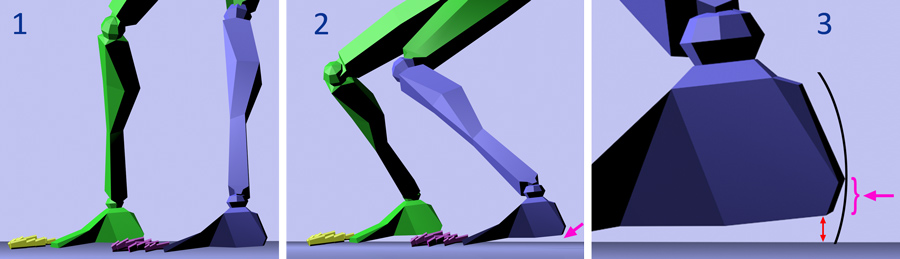
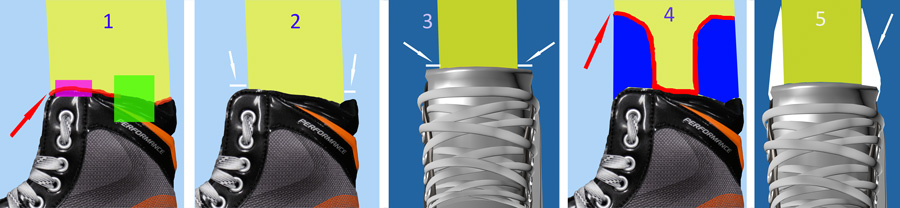
Although the human 'sideways stride' limit is goalie c, and the red arrows show the full roll and full stretch, the width of goalie skates limits power to goalie b, and the brown arrows show a shorter roll and stretch. From point 'b', goalies can still widen out to a full stretch, but without power. Therefore: power is cut off by the inside width of the boot. This unavoidable - it is geometry. Try to understand the above, because a lot of goalies and people in hockey do not, and I'm at my wit's end trying to explain this very simple starting point. For now, let's just take one thing from the above: the inside width matters; the outside width does not. If you're not sure of this, go back to the beginning. In image A below, the outside of the boot has a yellow overlay because it is not a mobility concern, and the heel of the skate has a purple overlay for the same reason. The blue arrows below show how the heel is narrower than the toe area, and image B gives us a nice comparison to see why narrow is better. When the skate rolls down to about 20 degrees, the heel of the blade is still in contact with the ice (green arrow), so it's still able to deliver power, while the front of the blade was levered off at 45 degrees and is now high off the ice (yellow arrow). In fact, the heel of the blade delivers power down to about the same angle as Overdrive (red arrow), and if you have the flexibility and know how to use your heel, you can get right down to the 'sideways stride limit' of goalie c above. |
 |
If you widen out with the foot like image B above, the heel will bootout around 20 degrees - the heel width will lever the main blade off the ice. Frankly, this is no big deal, because at this angle, you have almost no push or extension left, but if you have the flexibility, you can get even lower using the 'back door' move. I have a whole page on it here, it's an easy move to learn, but I still don't see many goalies using it, even on TV. It reduces stress on the groin, it makes great saves look easy, it works while you're down, read the page. The point here is that if you know how to use your skates, you can get everything you need out of the heel. You don't need to reduce the width with a Vertexx-type cutout or improve the grip with another Overdrive blade - it's fine the way it is, hence the purple overlay above. The image below shows the goalies using the pushing foot heel (green arrows). As you go down, you rotate the toe up and dig in the heel. You won't use heel moves a lot, but the back door move will eventually be part of a goalie's skill set. |
 |
So that leaves us with the toe area, and we've seen how its width causes bootouts. The red arrow shows the full sideways stride, while area 1 with the brown arrow shows how much power you get before you bootout at 45 degrees. This means that area 2 and 3 are unused power, and this is what Overdrive, the Step blade and the Vertexx cutout are trying to exploit. We know how Overdrive uses area 2, and we'll look at the Step blade later, but the Vertexx cutout tries to increase power by making the shell narrower, so let's look at that now. |
 |
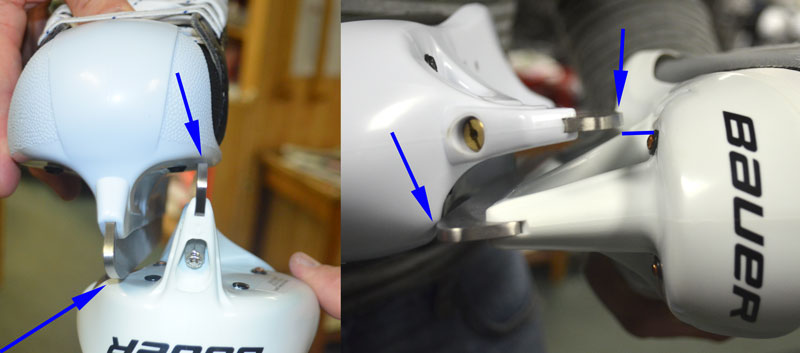
| Below is the Bauer Vertexx cutout, and you can see that it slightly reduces the shell width at the toe. On the Bauer install page, I've posted some info on the cutout and some problems with it, but for now, let's just look at its effectiveness. |
 |
| Below is a skate built in a 3D program to real-world dimensions. The program is very accurate, and this skate is equivalent in width to a Bauer or an RBK. Below left, the skate is rolled to the bootout angle of 45 degrees. Below right, the skate is rolled into the ice approximately the width of the Vertexx cutout, (green arrow), and this drops the skate down to 50 degrees, so you're getting an extra 5 degrees of push from the cutout. |
 |
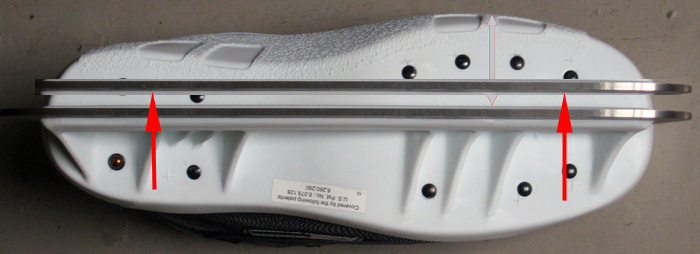
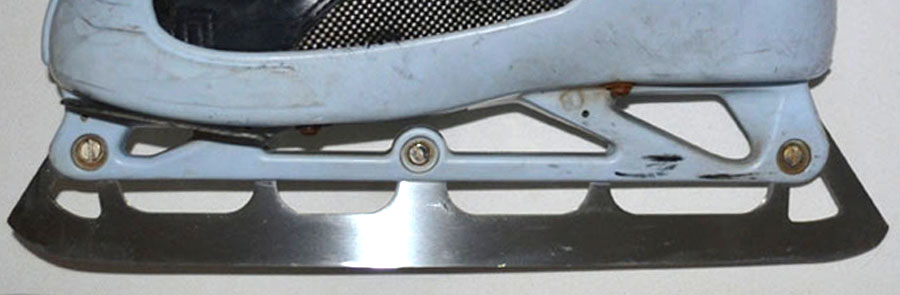
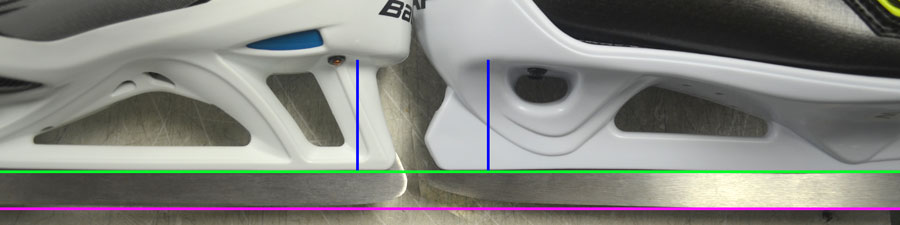
5 extra degrees is nice, but it might be better to get rid of the excess width between the boot and the shell (red arrows below). Skate companies make the shells to accommodate several sizes AND several widths, so a size 10 foot may use the same shell as size 11 EEE, which would explain the gaps below. With one brand, you may have a boot that fits flush against the shell, and with another brand, you may have a lot of room down there. You could always trim the shell back, but you need that protection, as we'll see below. |
 |
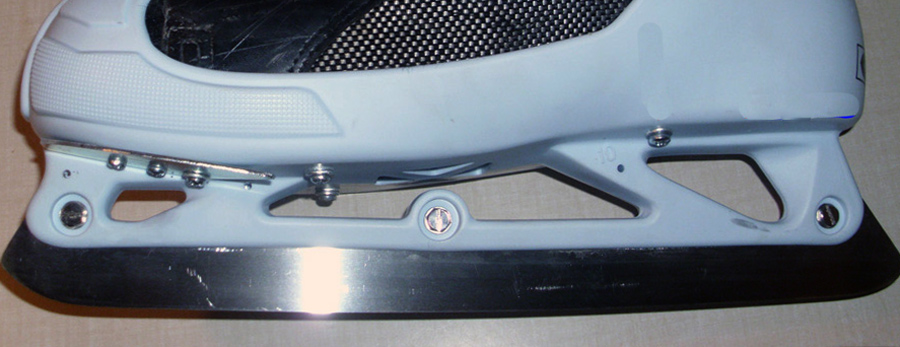
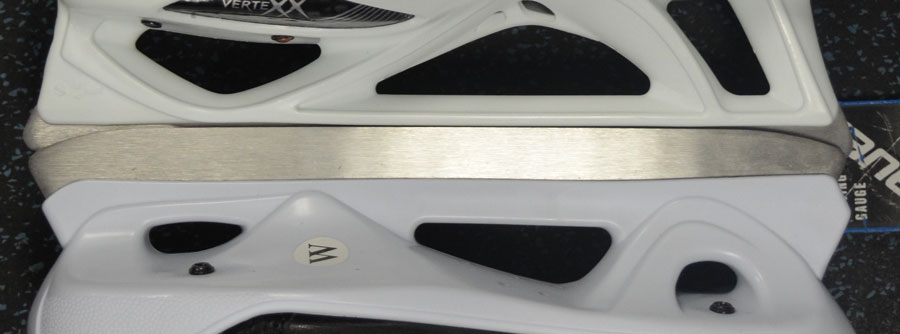
| Below is a shot of the new Graf in a lively color, and though the boot doesn't have a cutout, it is probably narrower than the skates above simply because the shell fits very close to the skate. However, you might want to have a look at the 'New Graf' install page, since this skate is a little thin on protection. |
 |
Below is the same size Vertexx (left) and a Graf 7500 (right). They are sort of lined up evenly, and it may be a trick of the photograph, but it looks to me like the new Graf is just a narrow. Try this for yourself at the store. |
 |
| I can't mention boot width without bringing up the Graf Cobra (I forget the model number) below, which they have finally discontinued after about ten years of not having a clue. As you know, they didn't narrow the boot, they widened it. The red line below left gives a rough idea of how much the boot was widened, and I'm being generous. So how bad a mistake was this? |
 |
| By widening the boot, you are increasing the bootout angle, so instead of booting out at 45 degrees, with the old Graf you bootout near 50 degrees (brown line and arrow, below left). Now so far, the red arrow has shown total available power, but this isn't quite true, because no goalie starts his moves with the legs at 90 degrees (below right, a). Goalies start their moves in the stance, with the legs far apart (below right, b). A wide stance, which is common now, will leave you with almost NO available power. Widening the boot reduces it even more, leaving you that much closer to a slipout. Mobility and injury are two sides of the same coin, as I have said many times. The Graf skate reduced mobility and increased the risk of injury. |
 |
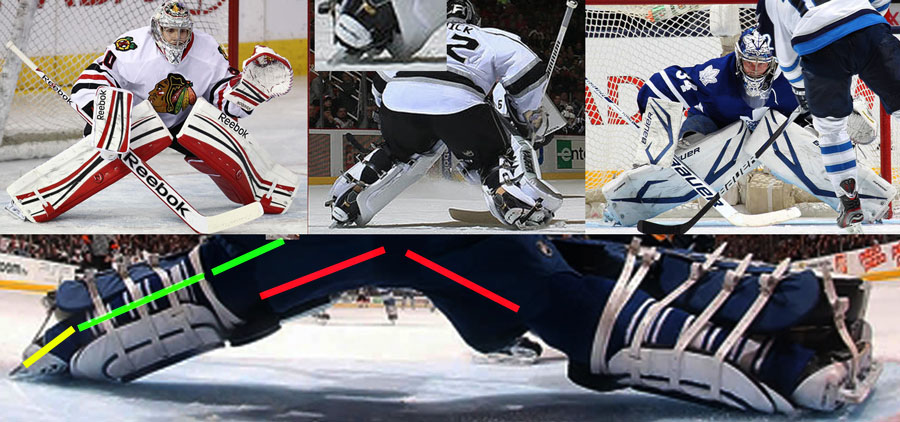
| Below left and right, Crawford and Riemer are in the common stance - wide feet with the trapper in the fingers up position, and their skates have very little push left in them. Quick usually plays quite wide, but here he has some push in his left skate (inset). So the big question is, how do goalies play if their skates and the stance gives them so little room to move. The bottom pic sort of shows how the foot rolls to the bootout angle and stops (yellow line), then the leg straightens out (green lines), and the more flexibility you have, the better (red lines). NHL goalies could move so much better if they didn't have to do this, and it would be a lot safer. Also, this is why some goalies don't feel Overdrive a whole lot - because they are still stopping the foot from rolling down (yellow line). You do have to reprogram your feet. And I can't resist a note on the trapper. If you use the 'fingers up', it won't work unless you get it right out front and hold it lower than you think, otherwise, shooters will go underneath it all day. They are catching on to this style. More on this later. |
 |
With the Vertexx shell, Bauer claims to get a 28% improvement in 'angle of attack', but I don't see it. Some people have said they get part of it by offsetting the blade. Below is a Vertexx, and you can see that the green line runs right through the middle of everything, so I don't think so. |
 |
| I have wondered about shifting the whole blade to the inside of the boot, like below. This would effectively narrow the boot, but I suspect it would cause balance problems and make you really susceptible to sprained ankles. The boot would have to be built up to compensate, and even then, it might not be worth it. |
 |
 |
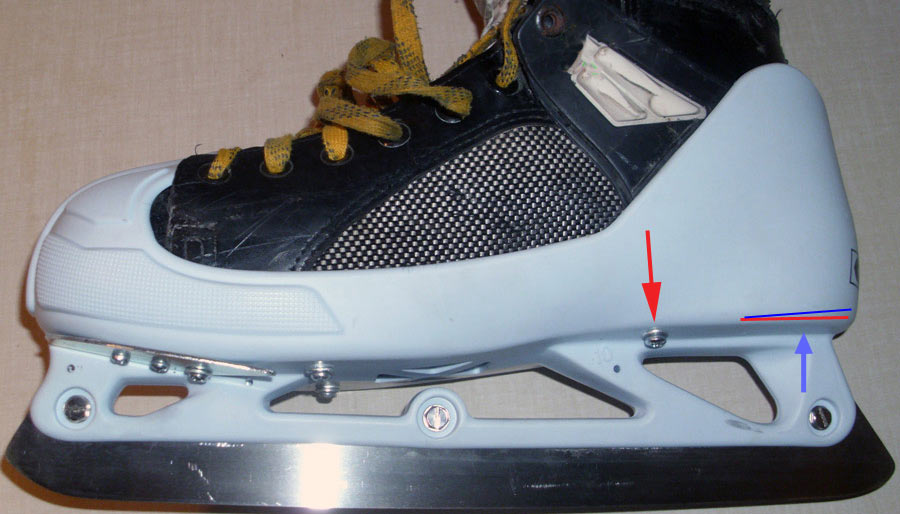
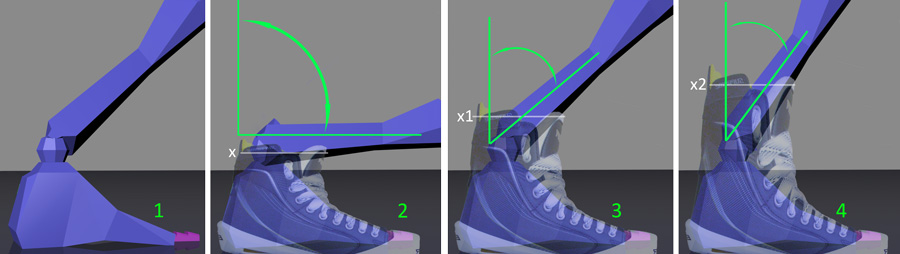
Here, I'm going to look at the distance from the bottom of the boot to the ice (red arrow, below left) and this could involve the height of the shell, the height of the blade, or both. Generally, taller is better, but we'll see that there are limits to this. Bauer claims that its Vertexx shell sits higher, and I'm not so sure about that, but there is no doubt that the Step Blade offers you more height, and the Step Extreme offers you a whole lot of height. I've used both in combination with Overdrive and together they make a great mobility package. Below is the same 3D skate as above, but taller, and instead of hitting the ice at 45 degrees, it now drops down to 30 degrees (90-60=30). |
 |
Below is my skate with a Step Extreme blade. I've been using them for over a year, and I can tell you that these blades, brand new, are too high for most goalies, me included. Right now, I'm slowly having them ground down to find an optimal height. The problem is that with all the lateral movement goalies do, you need a really, really good boot for control or you will wobble a lot, possibly right into a sprained ankle. I have a high boot that I tape a lot, and I still find the blade a little wild at times. This is a deal-breaker, because you need total control over your edges. Wobble in the boot translates down to your edges (more below when I cover the boot). On the other hand, you definitely get a ton of blade to work with and the bite is great. I went back to my old Step Standards (below) for one game, but there was no going back; the bite on the Step Extremes is just too good. |
 |
| Below is the same skate a couple of years ago with a new shell and the Step standard blade, which I loved from the moment I put them on. They are higher than the normal blade you get with goalie skates, and I recommend them for everyone. There was no break-in time, and the Step steel is great. I've noticed that other blades didn't hold an edge as they got older. Maybe it was me, or maybe the steel burned and couldn't hold an edge, but there's no doubt that new steel really holds an edge, and the Step steel has been consistently good. Somewhere between the Step Standard and the Extreme is an ideal height, and I'll update on this later. |
 |
| Below are my brand new Step Standard blades (1) and the same blades worn down from sharpenings (2). The green arrow in both shots is the same height for an idea of how much blade I lost. The perspective is off on the lower shot, but the blades roughly line up (blue lines), making it a useful comparison. As well as losing height, I also lost a lot at the front of the blade, which was really noticeable. The Step Standard blade is 10% higher than a regular blade, and I expect most skate companies will start offering higher blades. |
 |
| The shot below gives you some idea of the difference between the Step standard and Extreme (again, the perspective is off slightly). The standard is 10% higher than a normal blade, and the Extreme is 30% higher. With the Extreme, you can angle the boot down to about 35 degrees. |
 |
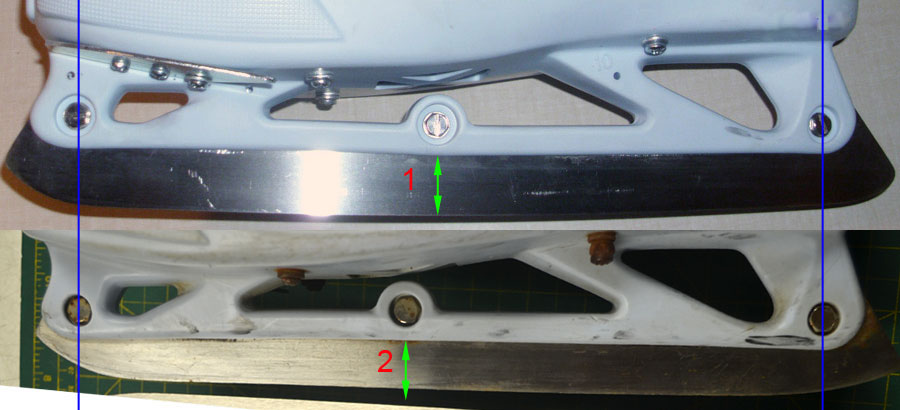
| I still can't figure out where Bauer's 28 degree 'angle of attack' improvement on the Vertexx is. We saw that the cutout narrows the boot for some improvement, so the only other alternative is a higher boot. Below left is the new Graf up against the Vertexx, and they look to be the same height, since they touch at the same time (blue arrows). However, there is quite a difference at the heel (blue line, below right). |
 |
| Below are the same skates heel-to-heel, and they are the same size. The blue line is exactly the same on both skates, and in this case, we don't see much of a difference. The Bauer is likely a little taller at the heel, but perhaps the difference in the shot above resulted from the taper at the heel of the Graf blade. I have no idea why Graf did that. More blade, even at the heel is better. |
 |
 |
Below are the same size Graf G7500 and Vertexx, and you can see that they have the same blade length. I thought Graf used a shorter blade, and was once told by a rep that the shorter blade offered better agility, and that is true. You'll notice you can pivot easier as your blades get ground down and they develop a rocker. Conversely, with a longer blade, you won't be as agile, and I have definitely noticed this with the Step Extreme. Sometimes, it feels as if I am on skis. Normally, I'm very agile, but now I have trouble pivoting around the net on a dump-in. Similarly, on the back-door move you need to roll to your heel, but with the long Step Extreme, your foot feels as though it is either up or down, with no finer moves in between. |
 |
| Below is my skate up against my friend Dan's Graf G7500. His foot is a size or two smaller, but there is still quite a difference. The Step Extreme is a good blade, but it needs to be shorter and not as tall. There's no point in adding mobility with a taller blade and then removing mobility by reducing your agility. Goaltending involves so many fine movements that you can't afford to have them reduced by a blade that feels like a ski. |
 |
 |
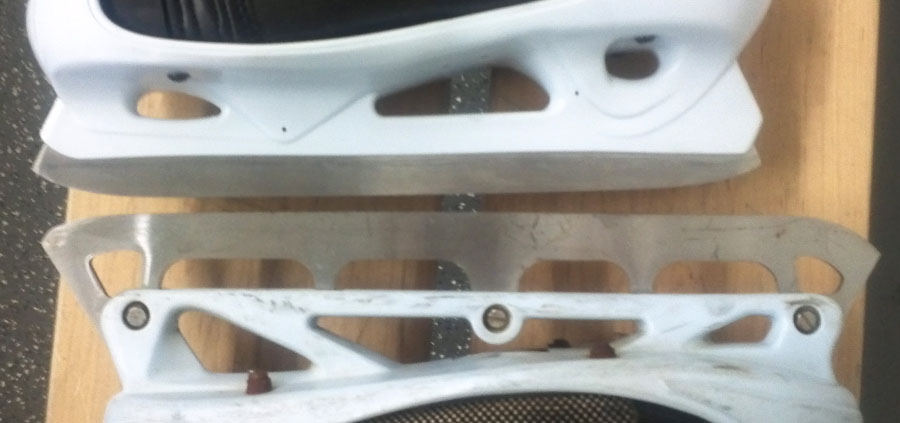
| Below is a shot of my old Bauer skates with a really low blade. I have no idea how I played with that. Also, I have no idea how I got all those puck marks. I was wearing Brians DX2 and Thiefs at the time, and like everyone else, I wear them loose. The protection this shell offered was perfect, although some of it could have been trimmed for weight savings. |
 |
| Below are an RBK (left) Bauer (middle) and Graf (right). On my RBKs, I've taken several shots off the ball of the foot (green arrow) that I really felt, but otherwise the protection is good. Also, there is no need for that raised part on the RBK shell (blue arrow). It's useless and just adds width. The Bauer shell looks like a nice combination of weight savings and protection, although the ball of the foot may be a little low. The outside of the foot and the heel don't need much protection other than what the boot provides. The Graf protection is really worrisome, and I would never buy this skate simply because the ball of the foot is the primary impact point and it's completely exposed. See the 'New Graf' Install page, where I have a lot more pictures of other skates with puck marks, which show exactly where your protection should be. |
 |
 |
It's often said that goalies have to be the best skaters on the ice. I don't know about that, but their movement requirements are far more complex. On any given play, a goalie may have to plant the foot to power an explosive move, stop on a dime, subtly shuffle sideways to track a player, and then drop to the ice before securing a recovery, all while covering his angles. Mobility requirements like these put goaltending on a completely different level than players. Player's blades really only have to move in two directions: forward and backward. The blades are too thin and too sharp to allow for sideways slide other than on stops, which is not a move. Goalie blades have to move in every direction, but most of their movement is side-to-side across the crease, and this creates conflicting requirements out of your edges, particularly your inside edge. |
The inside edge is your working edge, the one you use all the time. In the image below, I put the feet closer together than they normally would be, but you can see that when your feet widen into the stance, you are on the inside edges (red and blue arrows). To understand the conflict goalies have with their inside edges, below is a butterfly slide to the right (green arrow). Eventually, the left foot will go down as well, but to power the move, that inside edge (red arrow) needs to be very sharp to hold the foot firm. You never want the left foot to give out and slide against the move (yellow arrow). Conversely, the right foot has to slide out, so you want that inside edge (blue arrow) to be dull, because a sharp edge will cause the blade to stutter, slowing or even stopping the move. |
 |
| Below is the same move to the left, so everything is reversed. Now the right edge (blue arrow) needs to be sharp and the left edge (red arrow) needs to be dull. That, in essence, is the problem all goalies have with their edges: the same skate needs to be sharp on one move and dull on the next. |
 |
Now you can see why goalies are so finicky about their sharpening. That inside edge needs a perfect combination of sharpness and dullness to accommodate lateral moves. Edges that are too sharp will make your feet feel like they are stuck in railroad tracks. Edges that are too dull will give you no grip. In both cases, the results will be disastrous for your game. Sharpening means bringing two edges to a point, and with skate blades you do it by creating a hollow. The image below shows three blades on the left skate with different hollows. The red edge is the inside edge, and the pink edge is the outside edge. The hollows are exaggerated. #1 has no hollow and the edges are almost square. For goalies, the flat-ground sharpening is useless. Both edges will offer very little resistance when sliding sideways, but the inside edge won't be sharp enough to grip the ice for any kind of a move. #2 is closer to what goalies use. The inside edge (red) will offer OK grip on a push and not bite too much when the foot has to slide out. With a shallow groove like this, you have to maintain these edges almost daily, because they dull down very quickly. #3 has a much deeper groove, so the inside edge will be strong enough to give you high-level push, but it will stick a whole lot when the foot has to slide out. However, when this edge dulls down (#4), it still has enough of a point to give a great push, and the rounded edge slides out better. I've always preferred a dulled down deep groove as a solution to the conflicting needs of the inside edge. It's not for everybody, but if you go with a shallower groove, the push may be weaker and you'll have to sharpen your skates more often. |
 |
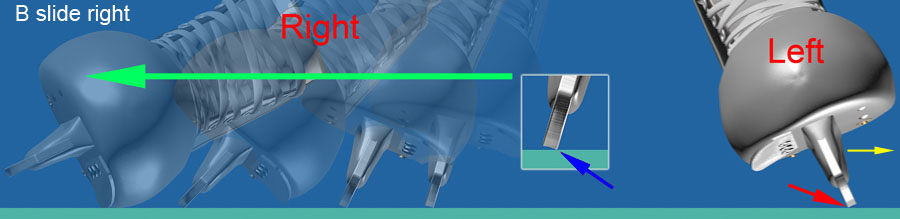
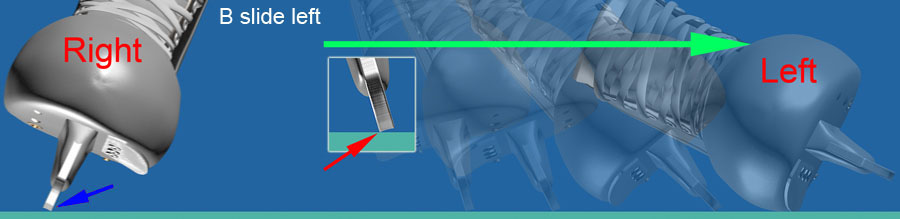
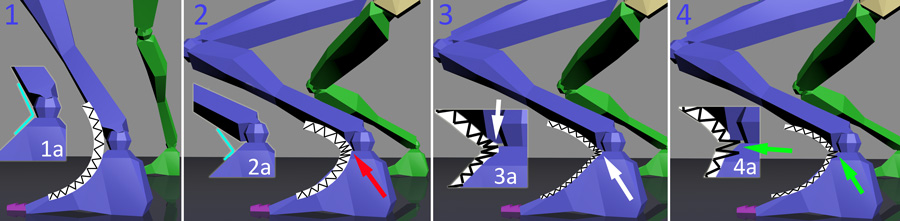
At the top of this page, I took some time to explain why the outside width of the skate is not important, and for the same reason, the outside edge is no big deal either. To stop a puck, your feet will be rolled to the inside of the boot and the outside edge will play only a minor role. The inside edge is your working edge. If you're unsure of this, go back and review it, because I'm going to move on. On 'B slide left' and 'B slide right' two images above, the outside edge wasn't part of the move, but anytime you do a move on your feet, the outside edge can get in the way to slow the move, stop it, or even cause the foot to flip over in a sprained ankle. The 'shuffle right' (or left) below is a common cross-crease move, and again, I placed the feet closer than they would be. The left foot stays planted while the right foot slides sideways, but if you tried to slide Skate 1 to the right, the inner edge would dig in too much at that angle, sort of like a chisel (purple line). To get around this, goalies roll the skate up towards 90 degrees (skate 2), and this somewhat disengages the edge for the foot to slide sideways (skate 3 and red arrow), before the skate rolls back into the stance (skate 4). |
 |
Although straightening the skate to 90 degrees (Skate 2) eases the slide, it's a tricky move, because you roll the outside edge to the ice (little green arrow), and this edge is easy to catch. It can hold up the move or even roll the foot over into a sprained ankle. Below, the green arrow shows the direction of the right foot sliding out, and the red and purple arrows show how this move affects both edges. Each edge has two sides (little white arrows), a flat outside and a rounded inner portion. When the foot slides out like this, the inside edge (red arrow) will slide a bit easier because the ice is hitting the rounded inner portion (red arrow on 1a). The outside edge (purple arrow) will dig in more because the flat part of the edge is hitting the ice (purple arrow on 1a). So on the 'shuffle right' above, you have to be careful not to catch that outside edge, and it's better if you keep this edge dull, especially if you have a deep groove, since this edge never really does much anyways. Getting perfect edges on every sharpening requires some luck or a really good trainer, so if you don't have either, it's better to get them too sharp and dull them down. There are a number of ways to dull your edges but you have to be careful, since you can take too much edge off (see Sweet Stick below). As with everything, a little practice makes perfect. You can use a stone while in the dressing room, but that involves too much guesswork. Use it at the bench during warm-ups, testing the edge as you go. While in the net, I sometimes drop my stick and run the outside edge back and forth on the shaft. The wood of the shaft doesn't take as much edge off, but it works. Also, if the edges are only a little too sharp, I'll do a bunch of hard sideways slides (standing), and that will smooth things out as well as get my legs going. |
 |
Having looked at both edges, we can see that goalies need a strong inside edge for high-level pushes and a dull outside edge that won't catch. I used to have nothing but problems with my blades trying to balance these two needs, but the offset cut cured all of them, and I haven't used anything else for years. Bryden at Toronto Hockey Repair is the only person allowed to touch my skates. I'm not really sure what he does (it's a trade secret) but I do know that the whole rig is lowered so that the outside edge ends up higher than the inside edge. Below, the dark blue squares represent a blade with the offset cut and the groove is exaggerated. When I look at my edges, I can't see the offset, it's very slight, but I can feel it. #1 below shows how the inside edge (green arrow) is sharpened so that it is higher (or lower, depending on how you see it) than the outside edge (yellow arrow). This allows you to put a deep groove on the blade for a very sharp inside edge (green arrow) while getting the outside edge up and out of the way for sideways shuffles. #2 below, the shaded area shows a normal cut with no offset, and since this cut sharpens both edges equally, you have to go for a shallower groove to avoid catching (yellow arrow). As with all sharpenings, you can get different hollows on the offset cut, but I get a deep player's groove (sometimes called an 'A' groove). The inside edge (green arrow) quickly dulls down so that it doesn't catch, and the edge I'm left with is pointed enough to provide a strong push. This edge lasts a long time, and I usually have to sharpen it only because of repeated post hits. #3 below shows the right blade straightening up to 90 degrees on a sideways shuffle (red arrow). With the offset cut (dark blue) the outside edge (dark yellow arrow) is up and out of the way, while with the normal cut (light shaded), the outside edge (yellow arrow) can hit the ice and catch. With the offset cut, you'll notice a slight wobble when you skate slowly, like from the bench to the crease at the beginning and end of a period. On delayed penalties or dump-ins, you're pushing harder and using your inside edges more so you shouldn't notice any difference. Finally, all edges sink into the ice slightly while in use, but this doesn't change things; the offset does reduce catching. |
 |
Since goalies play balanced on a knife edge, it's crucial that the edge not only be sharp but also be properly rockered. Successive sharpenings will round out the blade in all kinds of ways, sometimes making a good sharpening pointless. Below is a side view of two blades. #2 is a blade that has been sharpened a number of times, and the black arrows show how the sharpening rounds out the blade and reduces its contact with the ice (red lines again). You need some rocker because it improves your agility, whereas a long, flat blade can make you feel like you're on skis, but there's a limit. Old blades can end up with very little edge on the ice, as little as one inch of blade. And not only that, the range of blade in contact with the ice can vary all over the place, perhaps giving you 2" on one skate (green arrow) and 4" on the other (blue arrow), and in any other combination you can think of. This will ruin your balance, your movement, everything, and numerous sharpenings make this situation inevitable. Other than getting new blades, the only way to correct this problem is to have your skates cagged. The CAG machine automatically grinds your blade down to a proper rocker, after which, they must be sharpened. |
 |
As a final note on sharpening, one thing you should do is buy a Sweet Stick for touching up your edges. When Overdrive was outlawed, I started hearing all kinds of things that it supposedly did that were bad, and I'd wonder, 'Where do people come up with his stuff?' Well, I hear all kinds of things about the Sweet Stick, things like it hurts your blades or damages the steel. No. Anything it might do to your edges is removed when you get them sharpened again. What it does do is tone up your edges when you really need it. If you are taking your warm-ups and you find that your edges are dull, or there's a dull spot on one of your blades, it is far better to tune them up with a Sweet Stick than go through a game and play like garbage because your edges are off. You can run it over one small spot or the whole length of the blade. Sometimes I'll do just the front and back of my blades, one or both. Rarely will I give the whole blade more than two swipes. If your blades need more than that, then it's time to get them properly sharpened. You have to be very careful with the Sweet Stick, because if you overdo it, they can become way too sharp. If you have new blades, using the Sweet Stick too much can turn them into razor blades. And don't press too hard. It's best to do less and then slowly, carefully touch up the blades until they're right. Don't do it in the dressing room; do it on the ice and check your edges as you do them. A lot of times I leave the Sweet Stick on the bench in case I need it. Also, don't get the imitation Sweet Stick for forwards, which is so narrow that a goalie blade barely fits; get a proper Sweet Stick that fits goalie blades. Finally, Overdrive can simplify the sharpening situation by reducing the inside-outside edge trade-off. You can play with slightly duller skates to get your sideways slide because Overdrive will back up your footing for a solid push. Another thing about Overdrive is that it can prolong a sharpening and even mask the fact that your skates are dull, because you won't be so obviously out of control. This happens to me all the time. Inevitably, I'll know it's time to get my skates done only when I start to play like garbage. I don't recommend this method. |
 |
 |
You can spend all the time in the world getting your edges right, but if the fit of your skates isn't perfect, you won't transfer power quickly or efficiently. Your moves will be sloppy and slower, and you might as well be playing on dull skates. Manufacturers have to make their product for a theoretical 'average person', which likely won't be you or me, so shop around to find a boot that fits well, because each company builds to a different formula for the same size. I think some manufacturers still offer a custom fit for a few dollars more, so you might want to consider that option. If your skates are too tight, there's nothing you can do but get rid of them, but if they're a bit loose, one thing you can do is alter your insoles. My last boots were the right size, right width, but they felt a bit loose in front - remember that manufacturers build for an average, so unless you get a custom fit or are very lucky, they'll be off a bit somewhere. I replaced the insoles with Dr. Scholl's ones that you can buy at the drug store. Eventually, I had two insoles: one thick and one thin, and I did a lot of trimming to get them right. On the boot before that, I also had half an insole up around the toes, because I found that my toes were loose and it felt like they weren't part of the move. I cut the top half of the insole off and taped it underneath the bottom insole so I wouldn't feel it. I want all of my foot involved in the move from the first push, and when I stop, I want zero shifting inside the boot. This is what figure skaters need, and though you won't be pulling off moves like them, you have to aim for the same precision. You'll want to experiment with this, and instead of spending money on insoles that you might not need, try pulling them out of your running shoes and putting them in your skates beforehand to see if it helps. If you have a better idea, then use it, but one way or another, get a perfect fit and then keep that boot for as long as you can. I'll change any piece of equipment anytime except for my trapper and my boots, because they're so hard to get right and if they're off, they'll pull your whole game down. A lot of skates still come with the shell/blade combo, so if your blades are low and you're thinking about new skates, consider replacing just the shell if the boot fits well and hasn't broken down. You'll save money and break-in time. Replacing the shell is easy: you just pull out the rivets, pull out the boot, put it in the new shell, drill new holes, and secure it with hardware. Instead of rivets, I use the t-nuts that come with Overdrive, but heavier t-nuts that you can get at Home Depot will hold as well or better. You don't need to be precise when drilling the new holes; close counts and you can't go wrong here (mail me if you're worried). Also, there is no secret formula for lining the boot up in the shell. Most of the time it will fit snugly, but if it's loose, just center it and you'll be OK. You need a perfect fit for precise movement, but because of the way skates are made and the movement requirements of goalies, a tight fit can cause some injury problems that can be a lot of trouble. I'll look at three of them: lace bite; ankle bite; and heel spurs. |
Lace bite is a common problem that can be a little bit worse for goalies because they are always leaning forward in their stance. I don't recommend that you loosen the laces if you get it because this will increase sideways roll, and after reading the next few sections, you'll understand why. You need your laces to stay tight, so when you do get lace bite, direct your attention to the tongue. |
 |
#1 You tighten your skates for the angle your foot takes when you are standing straight. Skate companies have a tough time designing tongues because they have to consider this trade-off: forward lean versus protection. Next time you're in a store, compare the tongues on various skates, forward and goalie, just to see how the different manufacturers deal with this problem. I've had lace bite on most of my skates, mainly because I hate changing boots and keep them to the bitter end. Whenever I do get lace bite, I just cut some foam and tape it to the tongue, then alter it until it's comfortable. Don't get fancy and sew it on; tape works best, and besides, it'll take you a few times to get it right. See the 'Equipment' page for info on foam. |
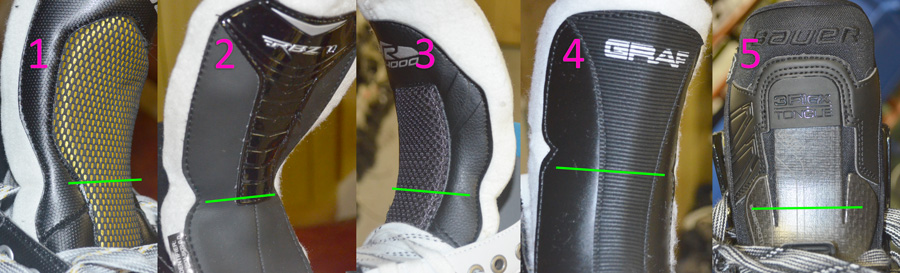 |
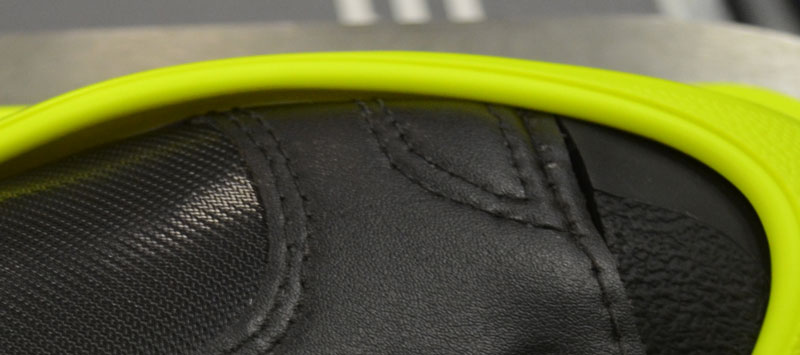
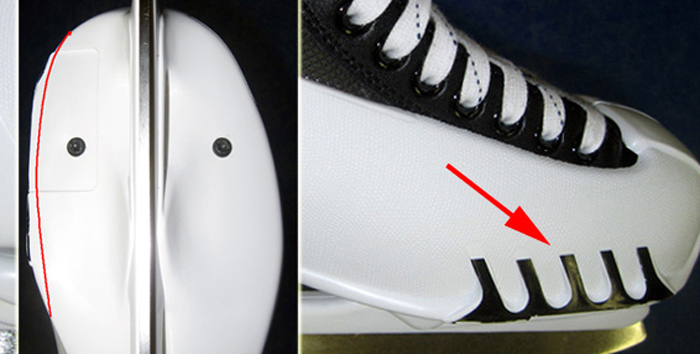
#1 above is a Bauer, and the green line shows where the tongue is going to bend, and this one is really thin. It's a light foam under that yellow mesh and I don't think it will be long before you get lace bite with this one. #2 is the new RBZ, and you can see that they've put a harder, plastic-type material on it, but it ends a little short. #3 is a higher quality Bauer and this time they beefed up the mesh stuff in the middle with some harder foam that should last a while. #4 is a Graf, and they ran that harder, plastic stuff down the middle, and it has ridges that may help with forward flex. #5 is from a top-of-the-line Bauer forward skate, and behold, for here is the king of all tongues. They did a great job, and the guys at the store (Toronto Hockey Repair/Goalie Heaven) say they haven't heard any complaints, as opposed to all the others. It has this harder, carbon-type stuff in all the right spots, they've taken flex and lace pressure into account - it really is a thing of beauty. Take a look at it when you go into a store, then compare it with what goalies get, and remember that we need a good tongue way more than forwards do. It would be really nice if you could upgrade a skate with a better tongue, and I would take #5. |
I don't know what else to call this problem, (I didn't want to call it tongue bite) but it happens when the edge of the tongue is squished into your ankle (or the rest of your foot) when you tighten your skates, and yes, it hurts. If you wear your skates loose at the ankle, you may not get this problem, but again, after reading the next few sections, you'll understand why you need the ankles to be tighten. Taping the ankles can also cause ankle bite. |
 |
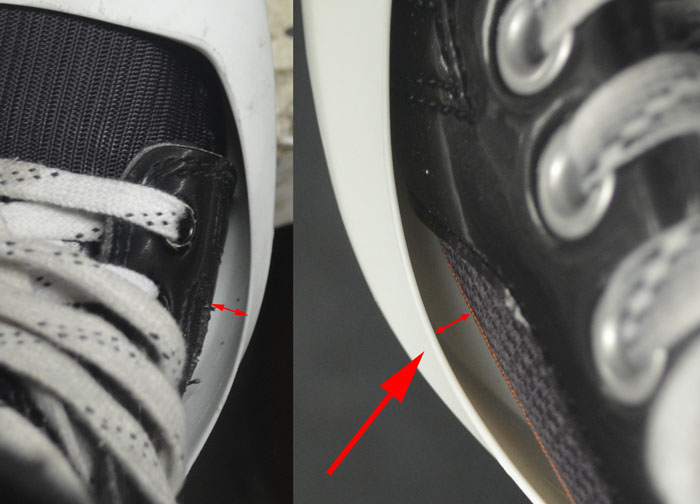
#1 The green part shows the outline of a tongue, and the red lines at the ankle indicate the area we're interested in. |
Tightness at the heel is a serious problem that you need to know about because it can ruin your feet for all time. I've known a few players (forwards) who got really bad heel spurs and had to stop playing. I got them years ago when I bought a pair of Bauers that felt right in the store but were a little too tight once I started playing with them. The bone of the heel reacted to the friction by growing little bumps on my heel and they never went away. One player I knew had an operation to take them down, but they grew back again - the body will do things like that. |
 |
When you're standing (#1 above), your heel will be on the ground, but when you go into a crouch, your heel lifts (#2, pink arrow). If your skates are a tight fit at the heel, every time you go into the crouch, your heel will lift and rub inside the boot against the heel (#3, pink bracket). Your skate won't lift, your heel will. Doing this a few thousand times not only hurts a lot but will also cause the bone to react by growing, making the problem worse. They're called bone spurs or heel spurs, and they look like little bumps on your heel. If you let this go on, they'll grow and grow and you'll have a difficult time finding skates that fit. Have a look inside your skates at the heel and see if the leather has been rubbed away. One thing you can do is have the heel punched out, and most hockey shops can do this. I had it done and then bought a Dr. Scholl's foam that glued inside the boot. It worked, but what really helped was getting rid of those skates. Below is a shot of my previous boot, a Bauer 1000 forward boot inside a CCM shell. Forward boots are about one eyelet higher, which is one reason why I switched to these - I wanted more control with a higher boot. But, with the higher boot, your heel really digs into the boot when you take your stance. The extra height of the boot locks the foot in place and pushes the heel into the back of the boot. This might be one reason why goalie skates were lowered in the first place. When I got these boots, I didn't want more heel problems, and below was my solution, which worked perfectly. The red arrow points to where I put the heel screws (I used 4mm screws and t-nuts, not rivets), and the blue arrow points to where they normally go. Placing the screw where I did allowed the boot to lift very slightly when I went into my stance (red line to blue line), and that was all the foot needed to prevent heel rubbing. There was no loss of control, but this worked only because a forward boot has a plastic sole running the length of the skate, which goalie boots do not. Doing this to a goalie boot would cause it to quickly break down at the heel. |
 |
Below are my new (used) boots, and I had been looking for a pair of these for a long time (I paid $20.00). They're a little narrow, so I didn't use the bottom two eyelets (pink arrow). No one makes these boots anymore, but the idea of the hinge (green arrow) works well for goalies because it gives you the control of a higher boot with all the forward flex you need. The boot is modelled on a ski boot, all plastic, made in two pieces with a foam insert that you can remove and throw in the washing machine. I added a Dr. Scholl's type insole. Again it is a forward boot, but I attached them at the heel in the normal way because the hinged ankle removes any bone spur problems. The boot is also very light, which is a big change from the ones above. We'll get back to these boots later, but for now, I'm showing them to point out that the hinged ankle removes the heel spur problem, especially with a higher boot. |
 |
|
The movement you get out of a goalie boot should reflect the movement of the foot, and this is what goalie skates do, they give you everything you need, but we're going to see that this causes control problems, especially because goalie movement is almost all lateral. The movement requirements of the foot boil down to two movements: forward/backward flex, and side-to-side roll. Forward/backward flex (below left) allows you to lean into your stance or extend the foot forward. Side-to-side roll (below right) follows the limited ability of the foot to roll sideways, allowing you to turn, transfer some power, or make small adjustments in your move. Again, goalie skates don't restrict these moves in any significant way. |
 |
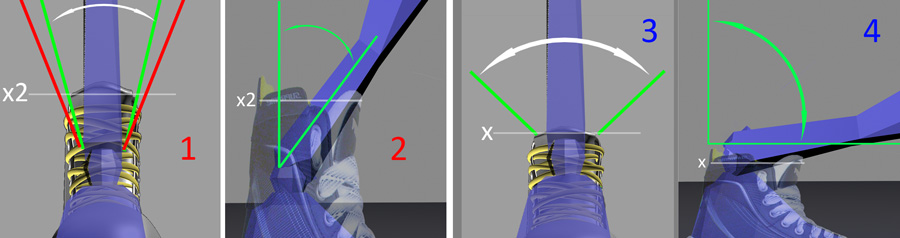
The image below shows how the height of a boot can restrict forward lean. Goalie boot height is somewhere between #2 and #3, so with some bend in the boot itself, you'll have all the forward flex you need. Goalie boots are about one eyelet lower than forward boots, likely to allow for more forward lean. |
 |
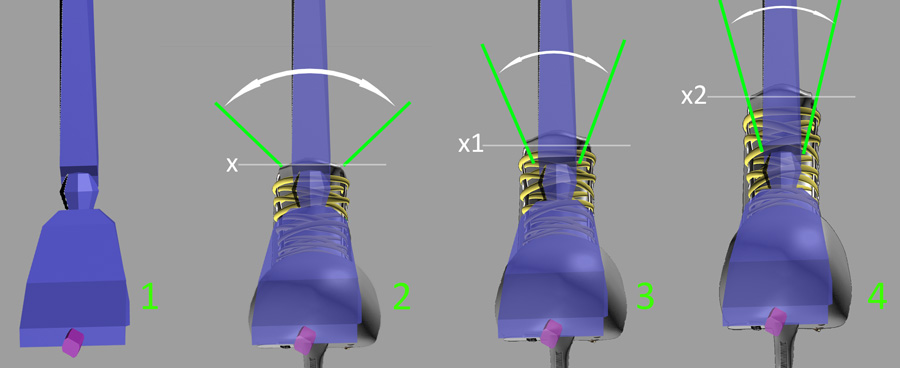
The image below shows how boot height affects side-to-side roll. The images aren't exact and are only meant to show that a higher boot restricts roll. Again, a goalie boot is somewhere between 2 and 3, and with some flex in the boot, you'll have all the sideways roll you'll need. Although goalie skates meet all the movement requirements of the foot, the problem we're going to look at is that they give you too much movement and not enough control, particularly on sideways roll. |
 |
|
Goalies don't need a lot of sideways roll, and in #1 below (the same skate as above in #4), the green lines show how much sideways roll you'll use for most moves. If you need more, there's always some flex in the boot (red lines) or you could loosen the laces. Not enough sideways roll is never ever a problem, even with this very tall boot. The problem with this boot is that it won't give you any forward lean (#2), so goalie skates were lowered, resulting in very little ankle support (#3), but a lot of forward lean (#4). Below, we'll see why ankle support (or roll control) is so important. |
 |
Briefly, you need roll control because you are balanced high on a skate blade and almost all your movements are lateral. With the foot always sliding sideways, an inability to control sideways roll can translate into movement and injury problems. The only solution is ankle support because you have very little muscle control over ankle roll. Before we have a closer look at the problems involved, let's see what I did on my last skates to support my ankles while allowing forward lean. |
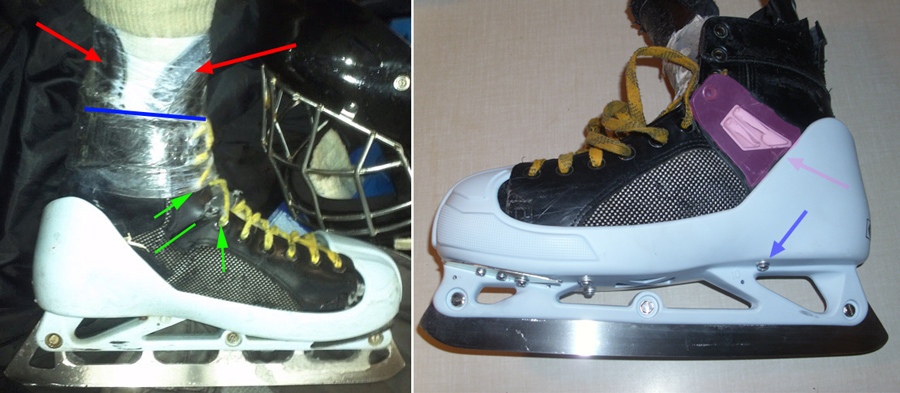 |
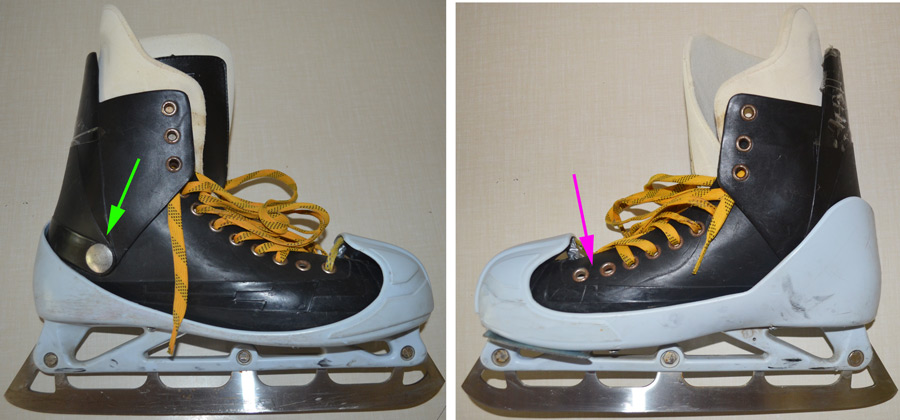
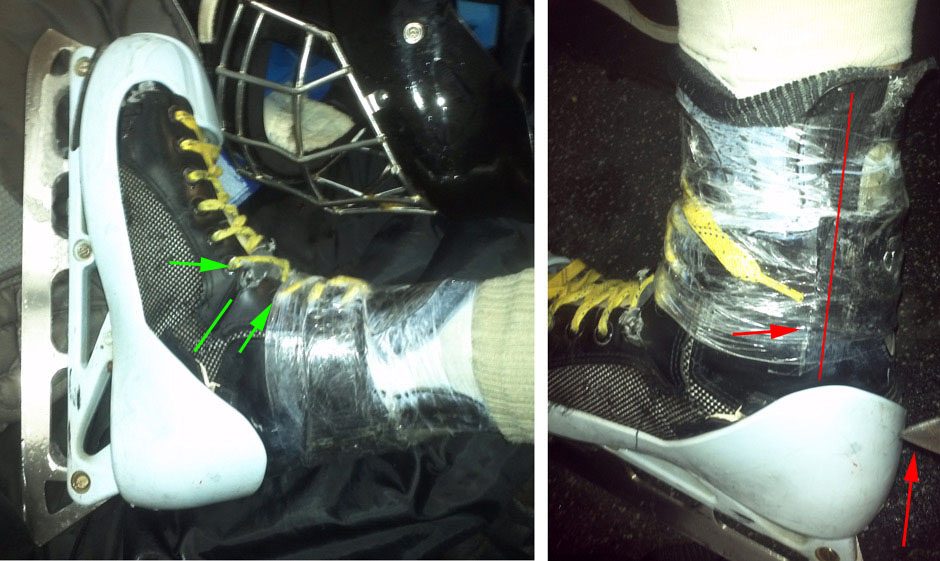
Above left is a shot of my skate (still on my foot). It's a forward boot (an old Bauer 1000) and all that tape effectively raises it to ski boot height. One reason I wanted a forward boot was to have the higher Achilles heel piece (red arrow left) and the higher tongue (red arrow right) to provide a gripping surface for the tape. On goalie boots, the tape has less surface to grip (along only the blue line), so it doesn't hold well. With all this tape creating a solid joint between my leg and the boot, wouldn't forward lean be restricted? Yes, but remember that I put the heel screw forward (blue arrow, above right) to deal with the heel spur problem, so that gives a bit of forward lean. There's also some flex in the boot, and I chose this boot with extra flex in mind. It's an older low-end boot, so it's not as stiff as the new ones, which don't bend at all. Also, it originally had a plastic piece with an eyelet that I cut off (purple arrow and shading, right). Getting rid of this created a gap in the lacing at the ankle joint (above left, two green arrows) that sort of created a hinge point to allow forward flex along the green line. All of this worked well. I had great ankle support, good control of my edges and no problem with forward flex. However, the skate wasn't made for this, so it broke down all along the hinge point (green line), including the tongue. After about two years, I ended up exactly where I had started, with all the problems of too much side-to-side roll, not at the top of the boot, but along the hinge point. Two problems this breakdown caused were a reduction in power and a loss of edge control. Whenever you get too much ankle roll, either from a low boot, a weak boot (hinge point, green line above), or a loose boot (below, next), you'll run into these problems. |
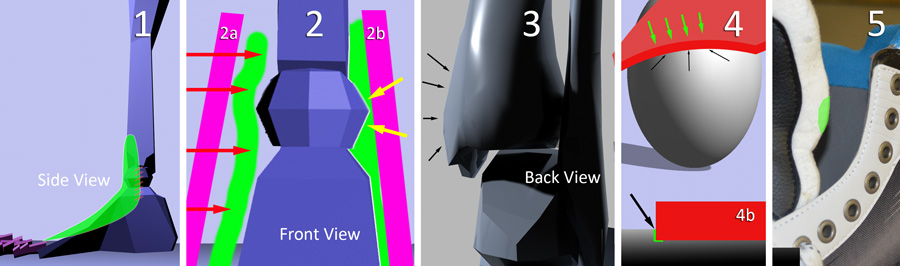
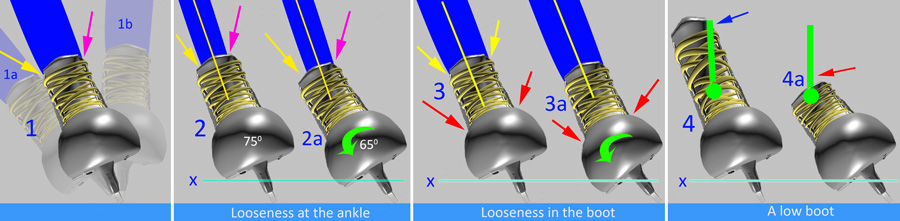
#1 below shows a skate with a tight seal between the leg and the boot (below, yellow and purple arrows). I widened the leg to illustrate the idea. As the leg rolls left and right (1a and 1b), the skate moves with it, resulting in a full transfer of power. Remember that goalies transfer power in this way - we move laterally, so we power a move using lateral roll. You must understand this to go on. Otherwise, re-read the 'shell' section above. #2 shows the same skate with looseness at the top of the boot (yellow and purple arrows). I narrowed the leg to illustrate the idea. #3 shows the same skate as #1. It has a tight seal at the top of the boot, but now the boot is weak, as my Bauer 1000s were (red arrows). #4 shows how a higher boot limits sideways roll when the leg (green line) hits the boot (blue arrow). Skate 4a has a low boot that doesn't limit sideways roll (red arrow), so the skate can easily roll too much and drop closer to the ice, especially on emergency moves when you have less control over your feet, all resulting in a similar loss of power (line 'x'). Note: Overdrive can mask this problem, because you are not rolling into a bootout, you are rolling into Overdrive that much quicker - BUT - Overdrive is weaker than the main blade, so it is still a power loss. |
 |
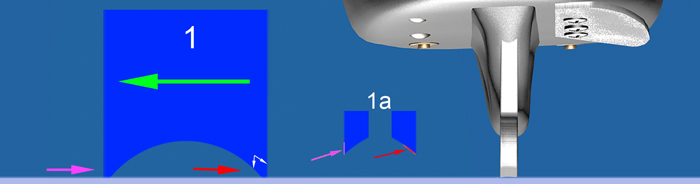
Poor ankle support can also result in a loss of edge control. Remember from above that goalies mainly use the inside edge, that they play the game balanced on a knife edge. Sideways roll puts you on or off that knife edge, so total control of sideways roll means total control of your edges. Looseness in the ankle, in the boot, and a low boot make it difficult to control sideways roll, and the bigger or more complex the move, the harder it is to control. Just to be sure of this, stand in a skate with the laces undone and see how hard it is to control sideways roll (be careful because you can sprain your ankle here). The image below shows how skate angle controls your edges. Panel 'a' shows the full range of goalie skate roll: from 1 to 2, after which you bootout off your edges. Panel 'b' shows a close-up of the same thing. Panel 'c' shows that this changes how your edge digs into the ice. Each angle, from 1 to 2 and every angle in between offers a different grip and has different balance requirements. How the blade sits determines how you will make a save, and you can't move across the crease expecting the blade to sit at position 1a only to have the boot roll on its own into position 1, because this changes your edge, how you stop, your balance and how you make the save. You need as much control over your edges as possible, and looseness in the boot transfers into uncontrolled roll that will degrade your game. |
 |
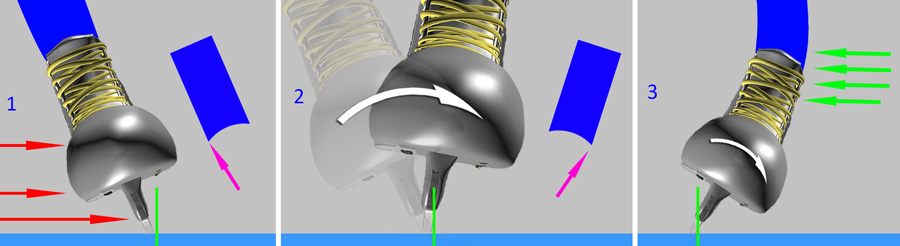
#1 below shows a right skate sliding out (red arrows) and stopping at the green line. That is where the goalie wants to stop to make the save. Stronger and harder moves are going to be difficult to control with a loose boot. The effect can be a lot like playing with dull skates: you'll lose your angles; you'll be slower to take up position, especially on multiple moves; and you'll play a little deeper than you should because you lack confidence in your moves. |
 |
 |
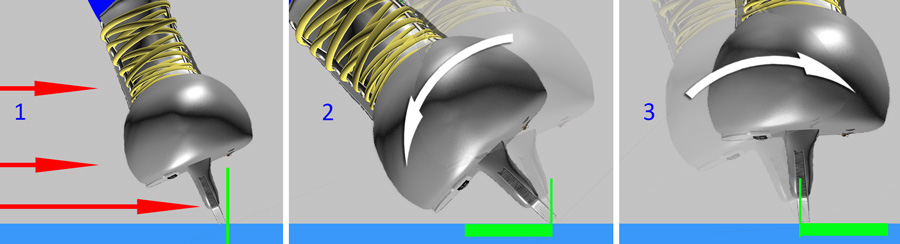
Another problem with looseness in the boot is sprained ankles. In #1 below, the skate is again stopping on the green line using the inside edge (purple arrow). Sometimes if you stop really hard, or if you hit a rut, the edge will lock and the boot will roll. In #2, the skate has rolled over so much that the blade goes onto the outside edge (purple arrow). That outside edge will really dig in, almost as though you've hit a rut, and momentum will keep the boot rolling (#3) so that it hyperextends your ankle into a sprain (green arrows). Remember that goalies are always sliding their feet out laterally, against the grain of the blade (like #1), so the risk of a sprained ankle is constant. |
 |
The offset cut reduces the risk of the outside edge catching, a higher boot reduces the effect of the foot rolling over, and taping your ankles will remove the danger of a sprain. If you've sprained your ankle, I highly recommend that you tape your ankles at least while you recover, otherwise, you'll find yourself re-injuring it, because the ankle will be weak and it will take less and less of a roll to hurt it. This injury can become chronic, and eventually a teeny-tiny rut will be enough to cause a lot of pain. Football players tape their ankles and goalies should too. Hopefully, all of the above explains why I wanted a higher forward boot with all that tape, and why I switched to the boot below. The hinge gives me all the forward flex I need, while the stiffness in the plastic controls sideways roll but still has enough give in it to allow for finer movements. It's a forward boot so it's higher, and I still tape the ankles, but not as much. Ideally, the boot could be updated with new materials and a better build, but I like it. I get all the control I want and it is very, very light compared to what I had before. |
|
With all of the above information, we can take another look at the Step Extreme blade and it will be easier to understand why I don't recommend it. The problem is not necessarily the blade, but the boot, because it won't give you enough control over sideways roll, which can get a little wild. Because you are a lot higher up, you'll feel like you're on stilts, sideways roll will be exaggerated, and if you catch a rut and roll over, you'll have a long way to go and can catch a wicked sprain. |
 |
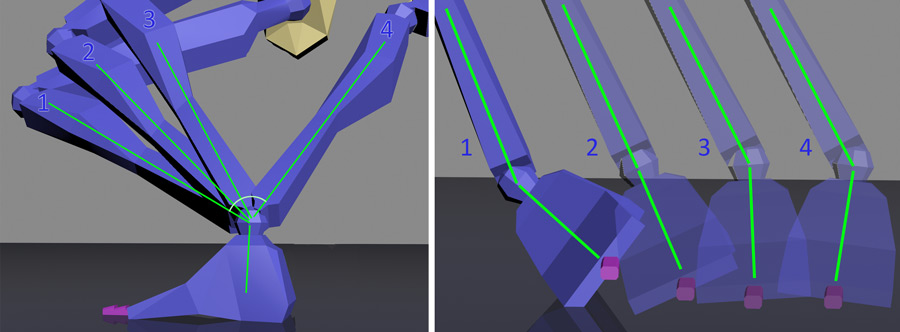
In #1 above, the skate is a normal height and the green line shows the vertical distance to point X on the boot. #2 shows the same skate scaled way higher, and the green line measures the same vertical distance to point X. In #1, the horizontal distance from the blade to the green line is measured by the red arrow. In #2, that distance is indicated by the blue arrow, and you can see how much farther it extends than the red one. #3 shows two weights, 'a' and 'b', hanging from their respective points X. The same weight hanging from 'a' will exert more influence on its point X than 'b' will simply because it's farther out. Hold a weight close to your body and then hold the same weight at arm's length and you'll get the idea. This is the problem with the Step Extreme blade - you're swinging a lot of weight as the boot rolls left and right, and at times you can feel a little top-heavy. You'll need a very good boot to control these blades, otherwise you'll roll way too much and have a difficult time controlling your edges. Also, if you're using the Step Extreme with an offset cut and a deep groove, like I do, then you really need good ankle control, because you're almost always only on your inside edge, even when you're standing straight. The offset cut works for stopping pucks, but when it comes to skating drills in practice or pivoting behind the net to play the puck, there is a wobble that you'll need to control, otherwise, your feet will lean to the outside edge, increasing the risk of a sprain. |
For all the reasons I've mentioned and especially if you wear the Step Extreme blade, it's a good idea to tape your ankles, and the first question is what kind of tape to use. I don't like the standard clear plastic tape that all players use. It's too narrow, you have to use half a roll per game, and sometimes the whole thing breaks in the middle of a game. If a crack forms, the whole thing tears and suddenly you're playing as if your skates have come undone. I don't like cloth stick tape either, because it doesn't have enough give. It's narrow, and once your ankles are taped, they feel too tight, and it doesn't allow for the fine sideways roll that you need. The idea is not to lock your ankles into an immoveable position but to create a solid but slightly flexible bond between your leg and your skates. What I use is plain old packing tape. It's not pretty but it works. I get a six-pack at Staples for $7.00. I buy the cheaper stuff because it has more flex; the better stuff doesn't give as much. |
 |
In Panel 1 above, the red arrow points to the line where you have to create a seal between the leg and and the boot. The purple square shows a thinner tape, the green square shows a thicker tape, so obviously the thicker tape makes it easier to bridge that gap. The problem with many new skates is that all the foam at the top of the skate makes it hard to tighten them close to the leg, so you can end up with a large-ish gap even when the laces are tight (white arrows, panel 2+3). One thing I like about a higher tongue and the Achilles extension (blue area, panel 4) is that it gives more area for the tape to grab onto (red arrow + line panel 4), and it snugs the top of the skate right up against the leg (blue area 4+white area 5), making it much easier to tape a proper seal. Taping a regular goalie skate (panel 2+3) is difficult, because even when you pile on the tape, you still get wiggle because the gap between the skate and the leg is big (white arrows, 2+3) and tape can only do so much. With weaker tape, all that wiggle can cause the tape to loosen or break. It'll take some trial and error to learn how to tape your ankles properly, but try working up to it over time, loose at first and eventually snug. You don't ever want it too tight because that can hurt. I've been doing it for years, and I still have to be careful, so as I tape them in the dressing room, I stand up and lean forward and roll the foot side-to-side to make sure I have the flex I need to move properly. If it's too tight, I pull some off. If it's too loose, I add a little more. Always test things in the dressing room by taking your stance, bending and leaning, because the tape cannot be corrected once you're on the ice. You're looking for a snug feeling at the ankles that doesn't restrict any forward lean and gives you a bit of sideways roll, just enough for finer movements. Below is a shot of my taped ankle, and this was a bit of overkill because the boot was very weak at the crease (green line) and extra tape helped a bit. My new,old boots get about half as much. Finally, the last problem is getting this kind of tape off. Forget about peeling it off in the usual way, because this tape glues itself together and doesn't peel off at all. What I do is score it with a knife tip, but don't cut into your boot, just score it, then lean your ankle forward and the hole thing will split where you scored it. It takes just a few seconds and comes off in one big piece. Below, the red line shows where to score it (not against your leg, please), the red arrow left shows a score mark, and the red arrow right shows the knife tip. |
 |
So that's it for this page on the skates. If there's something you don't understand or something you would like to see up here, then let me know. J
|